EdgeRouter - FQDN을 사용한 IPsec 다이나믹 사이트 투 사이트 VPN
download at 2017-10-11T18:12:08Z origin
Overview
 IMPORTANT: 다중 FQDNVPn을 미리 배포된 키로 인증하는 방식은 현재 버그가 존재합니다. 모든 피어에 공용 키를 사용하거나 RSA 인증으로 변경하십시오.
이 문서는 2개의 EdgeRouters 사이에서 DHCP를 통해서 퍼블릭 IP 주소를 얻는 정책 기반 사이트 투 사이트 IPsec VPN을 구성하는 방법에 대하여 서술합니다. 다이나믹 피어 주소를 사용하여 터널을 생성하기 위해서 DynDNS (다이나믹 DNS)가 전체 도메인 네임을 활용하여 각 피어에 사용합니다.
정책 기반 VPN 은 로컬, 원격지 서브넷 정의에 따라서 특징지을 수 있습니다. 정책 기반 VPN 타입과 달리 경로 기반 VPN에 따라서 달라지며, 가상 터널 인터페이스 (VTI)와 라우팅 엔트리 사용도에 따라서 특징 지을 수 있습니다.
 NOTES & REQUIREMENTS: EdgeOS 1.9.7 이상의 펌웨어가 설치된 모든 EdgeRouter 모델에서 적용 가능합니다. 커맨드라인 인터페이스와 기본 네트워킹에 대한 지식이 요구됩니다. 해당 주제에 대한 내용은 관련 문서 섹션의 문서를 확인하시기 바랍니다.
이 문서에서 사용한 장비:
- EdgeRouter-X (ER-X)
- 피어의 테스트 클라이언트 (Host1 and Server1)
Table of Contents
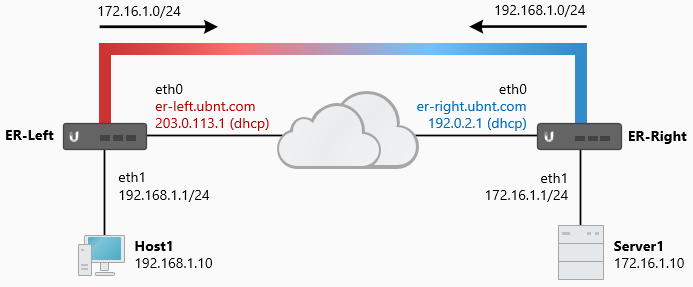
네트워크 다이어그램
EdgeRouter에서 사용하는 인터페이스와 네트워크 토폴로지 정보는 아래와 같습니다:
ER-Left
- eth0 (WAN) - 203.0.113.1 (dhcp) er-left.ubnt.com
- eth1 (LAN) - 192.168.1.1/24
ER-Right
- eth0 (WAN) - 192.0.2.1 (dhcp) er-right.ubnt.com
- eth1 (LAN) - 172.16.1.1/24
Steps: 정책 기반 VPN
라우팅과 동적 DNS는 양쪽 피어에 모두 설정되어 있으며 각각 FQDN을 사용하여 피어에 접속이 가능하다고 가정합니다.
IPsec과 관련있는 UDP 포트와 프로토콜은 다음과 같습니다:
- UDP 500 (IKE)
- ESP (Protocol 50)
- UDP 4500 (NAT-T)
생성할 VPN 타입은 정책 기반 VPN이며, 원격지, 로컬 서브넷을 사용하며 해당 서브넷 정보가 없으면 프록시 ID를 사용합니다. 이 값들은 정확하게 두 피어간에 일치해야하며, 서로 동일한 내용을 가지고 있어야합니다. 터널을 통해서 미리 정해진 값들만 프록시 ID에서 전송 가능합니다. 예제에서는 ER-Left는 192.168.1.0/24 주소를 LAN에서 보유하고 있으며, ER-Right는 172.16.1.0/24 주소를 사용합니다.
환경설정은 주로 ER-Left에 대하여 서술합니다. ER-Right 환경설정은 서브넷과 피어링 주소를 제외하고는 모두 동일합니다. ER-Right 환경설정이 다른 곳은 아래의 결과에 포함하였습니다.
 GUI STEPS: 라우터의 웹 관리 포탈 (GUI)에 접속합니다.
- ER의 IPsec 피어와 보안 설정(SAs)을 정의합니다. (<secret>을 원하는 패스워드로 변겅합니다.)
VPN > IPsec Site-to-Site > +Add Peer
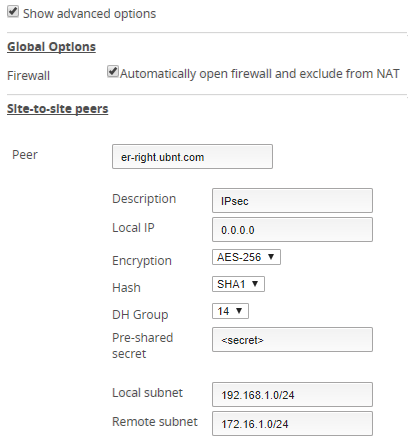
- 고급 옵션을 확인
- 자동 방화벽 개방과 NAT부터 얻는 트래픽을 제외
Peer: er-right.ubnt.com
Description: IPsec
Local IP: 0.0.0.0
Encryption: AES-256
Hash: SHA1
DH Group: 14
Pre-shared Secret: <secret>
Local subnet: 192.168.1.0/24
Remote subnet: 172.16.1.0/24

Note
Local IP any에서 로컬 IP를 0.0.0.0 을 사용하는 것을 권장합니다.
- ER-Right에서 IPsec 피어와 보안 설정을 정의합니다. (<secret>을 원하는 비밀번호로 설정합니다.)
VPN > IPsec Site-to-Site > +Add Peer
- 고급 옵션을 확인합니다.
- 자동 방화벽 개방과 NAT부터 얻는 트래픽을 제외
Peer: er-left.ubnt.com
Description: IPsec
Local IP: 0.0.0.0
Encryption: AES-256
Hash: SHA1
DH Group: 14
Pre-shared Secret: <secret>
Local subnet: 172.16.1.0/24
Remote subnet: 192.168.1.0/24
Steps: 커넥션 실패의 해결책
VPN이 피어와 연결이 실패에 대하여 3가지 해결책이 존재합니다:
- dhcp-interface 명령어를 local-address 0.0.0.0 에 사용합니다.
- 각 피어와 로컬 장비에 인증 ID를 부여합니다.
- 미리 공유한 키에서 자격증명 기반 인증방식으로 변경합니다.
 ** CLI STEPS:** 커맨드라인 인터페이스에 접속합니다. GUI의 CLI 버튼을 사용하거나 PuTTY와 같은 프로그램을 사용합니다.
1. 설정 모드로 진입합니다.
configure
- 현재 IPsec VPN 환경 설정을 확인합니다. (관련 결과만 출력합니다.)
show vpn
ipsec {
   site-to-site {
       peer er-right.ubnt.com {
           local-address 0.0.0.0
           }
       }
   }
...

sudo cat /etc/ipsec.secrets
%any %any : PSK "<secret>"

sudo cat /etc/ipsec.conf
conn peer-er-right.ubnt.com-tunnel-1
       left=0.0.0.0
       right=er-right.ubnt.com
- IPsec 인터페이스 주소를 변경합니다.
delete vpn ipsec site-to-site peer er-right.ubnt.com local-address
set vpn ipsec site-to-site peer er-right.ubnt.com dhcp-interface eth0
Note
dhcp-interface 와 local-address 구문은 동시에 사용할 수 없습니다. 0.0.0.0 주소는 설정에서 가장 먼저 제거하기 때문입니다.
- 변경 내역을 커밋하고 저장합니다.
commit ; save ; exit
- IPsec 보안 설정과 환경설정 변경 내역을 검증합니다. (관련 내역만 출력합니다.)
sudo cat /etc/ipsec.secrets
203.0.113.1 er-right.ubnt.com %any : PSK "<secret>" #RIGHT# #dhcp-interface=eth0#

sudo cat /etc/ipsec.conf
conn peer-er-right.ubnt.com-tunnel-1
       #dhcp-interface=eth0
       left=203.0.113.1
Note
ipsec.secrets 파일은 DHCP 인터페이스 링크와 피어의 FQDN 정보를 출력합니다. ipsec.conf 파일은 0.0.0.0 대신에 DHCP 인터페이스에 존재하는 IP와 연결됩니다.
show vpn ipsec sa
peer-er-right.ubnt.com-tunnel-1: #1, ESTABLISHED, IKEv1, 7d2d58dc63e145f6:99d93b7b64c51350
 local  '203.0.113.1' @ 203.0.113.1
 remote '192.0.2.1' @ 192.0.2.1
- 피어와 로컬 장비의 인증 ID를 정의합니다.
configure
set vpn ipsec site-to-site peer er-right.ubnt.com authentication id @er-left.ubnt.com
set vpn ipsec site-to-site peer er-right.ubnt.com authentication remote-id @er-right.ubnt.com
- 변경 내역을 커밋하고 설정을 저장합니다.
commit ; save ; exit
- IPsec 보안 설정을 검증하고 환경설정 변경내역을 확인합니다. (관련 내역만 출력합니다.)
sudo cat /etc/ipsec.secrets
203.0.113.1 er-right.ubnt.com @er-left.ubnt.com @er-right.ubnt.com : PSK "<secret>" #dhcp-interface=eth0#

sudo cat /etc/ipsec.conf
conn peer-er-right.ubnt.com-tunnel-1
       #dhcp-interface=eth0
       left=203.0.113.1
       leftid="@er-left.ubnt.com"
       right=er-right.ubnt.com
       rightid="@er-right.ubnt.com"

show vpn ipsec sa
peer-er-right.ubnt.com-tunnel-1: #1, ESTABLISHED, IKEv1, 10eb80b9f7d2b991:bf8b673e5eb44fc6
 local  'er-left.ubnt.com' @ 203.0.113.1
 remote 'er-right.ubnt.com' @ 192.0.2.1
Note
ipsec.secrets 파일은 %any 를 레퍼런스 하지 않습니다. ipsec.conf 파일은 피어의 leftid 와 rightid) 를 출력합니다. (이 값들은 *remote-id 와 id 에 대응됩니다.) @ 심볼은 IP 주소가 연결되는 것을 방지합니다. strongSwan documentation 문서를 참조하세요.
- 각 라우터의 RSA 키를 생성합니다. (공용 키를 보관하십시오)
generate vpn rsa-key
Generating 2048 bit rsa-key to /config/ipsec.d/rsa-keys/localhost.key
..............................................+++
..............................+++

Your new local RSA key has been generated
The public portion of the key is:

aBcDaBcD (output shortened)
Note
실제 공용 키는 8자 이상입니다. 이 예제에서는 ER-Left의 RSA 공용키를 aBcDaBcD 로 사용하며, ER-Right는 eFgHeFgH 를 사용합니다.
- ER-Right의 RSA 공용키를 복하여 로컬 키에 저장합니다.
configure
set vpn rsa-keys local-key file /config/ipsec.d/rsa-keys/localhost.key
set vpn rsa-keys rsa-key-name ERRight rsa-key eFgHeFgH (ER-Right public key)
- 현재 인증 방식과 미리 공유된 시크릿을 제거합니다.
delete vpn ipsec site-to-site peer er-right.ubnt.com authentication mode
delete vpn ipsec site-to-site peer er-right.ubnt.com authentication pre-shared-secret
- 이전에 정의한 rsa-key-name을 RSA 인증방식에 연결하여 구성합니다.
set vpn ipsec site-to-site peer er-right.ubnt.com authentication mode rsa
set vpn ipsec site-to-site peer er-right.ubnt.com authentication rsa-key-name ERRight
- 변경내역을 커밋하고 환경설정을 저장합니다.
commit ; save ; exit
- 관련 출력을 확인하여 IPsec 환경설정 변경내역을 검증합니다.
sudo cat /etc/ipsec.secrets
: RSA /config/ipsec.d/rsa-keys/localhost.key

sudo cat /etc/ipsec.conf
conn peer-er-right.ubnt.com-tunnel-1
       #dhcp-interface=eth0
       left=203.0.113.1
       leftid="@er-left.ubnt.com"
       right=er-right.ubnt.com
       rightid="@er-right.ubnt.com"
       authby=rsasig
       leftsigkey=localhost.pub
       rightsigkey=ERRight.pub
Note
ipsec.secrets 파일은 어떤 피어도 참조하지 않습니다.
테스팅 및 검증
IPsec VPN을 설정하고 난 이후에는 커넥션/상태를 다음 명령어를 통해서 검증할 수 있습니다.
- IPsec 보안 옵션을 검증하고 ER의 상태를 확인합니다:
show vpn ipsec sa
peer-er-right.ubnt.com-tunnel-1: #1, ESTABLISHED, IKEv1, 10eb80b9f7d2b991:bf8b673e5eb44fc6
 local  'er-left.ubnt.com' @ 203.0.113.1
 remote 'er-right.ubnt.com' @ 192.0.2.1
 AES_CBC-256/HMAC_SHA1_96/PRF_HMAC_SHA1/MODP_2048
 established 10s ago, reauth in 28176s
 peer-er-right.ubnt.com-tunnel-1: #1, INSTALLED, TUNNEL, ESP:AES_CBC-256/HMAC_SHA1_96/MODP_2048
   installed 10 ago, rekeying in 2658s, expires in 3591s
   in  ce5dcffa,    180 bytes,     3 packets,     5s ago
   out c4b4e6c0,    180 bytes,     3 packets,     5s ago
   local  192.168.1.0/24
   remote 172.16.1.0/24

sudo ipsec statusall
Status of IKE charon daemon (strongSwan 5.2.2, Linux 3.10.14-UBNT, mips):
 uptime: 5 minutes, since Jan 01 06:40:02 2015
 malloc: sbrk 376832, mmap 0, used 280024, free 96808
 worker threads: 11 of 16 idle, 5/0/0/0 working, job queue: 0/0/0/0, scheduled: 2
Listening IP addresses:
 203.0.113.1
 192.168.1.1
Connections:
peer-er-right.ubnt.com-tunnel-1:  203.0.113.1...er-right.ubnt.com  IKEv1
peer-er-right.ubnt.com-tunnel-1:   local:  [er-left.ubnt.com] uses public key authentication
peer-er-right.ubnt.com-tunnel-1:    cert:  "er-left.ubnt.com"
peer-er-right.ubnt.com-tunnel-1:   remote: [er-right.ubnt.com] uses public key authentication
peer-er-right.ubnt.com-tunnel-1:    cert:  "er-right.ubnt.com"
peer-er-right.ubnt.com-tunnel-1:   child:  192.168.1.0/24 === 172.16.1.0/24 TUNNEL
Routed Connections:
peer-er-right.ubnt.com-tunnel-1{1}:  ROUTED, TUNNEL
peer-er-right.ubnt.com-tunnel-1{1}:   192.168.1.0/24 === 172.16.1.0/24
Security Associations (1 up, 0 connecting):
peer-er-right.ubnt.com-tunnel-1[1]: ESTABLISHED 203.0.113.1[er-left.ubnt.com]...192.0.2.1[er-right.ubnt.com]
peer-er-right.ubnt.com-tunnel-1[1]: IKEv1 SPIs: 578c174f70ca41b8_i* 6ac0f86c4f0c7688_r
peer-er-right.ubnt.com-tunnel-1[1]: IKE proposal: AES_CBC_256/HMAC_SHA1_96/PRF_HMAC_SHA1/MODP_2048
peer-er-right.ubnt.com-tunnel-1{1}:  INSTALLED, TUNNEL, ESP SPIs: ca058e33_i cb8af1b9_o
peer-er-right.ubnt.com-tunnel-1{1}:  AES_CBC_256/HMAC_SHA1_96, 120 bytes_i (2 pkts, 69s ago)
peer-er-right.ubnt.com-tunnel-1{1}:   192.168.1.0/24 === 172.16.1.0/24
2. ER IPsec strongSwan 환경설정을 검증합니다:
sudo cat /etc/ipsec.conf
# generated by /opt/vyatta/sbin/vpn-config.pl

config setup

conn %default
       keyexchange=ikev1

conn peer-er-right.ubnt.com-tunnel-1
       #dhcp-interface=eth0
       left=203.0.113.1
       leftid="@er-left.ubnt.com"
       right=er-right.ubnt.com
       rightid="@er-right.ubnt.com"
       leftsubnet=192.168.1.0/24
       rightsubnet=172.16.1.0/24
       ike=aes256-sha1-modp2048!
       keyexchange=ikev1
       ikelifetime=28800s
       esp=aes256-sha1-modp2048!
       keylife=3600s
       rekeymargin=540s
       type=tunnel
       compress=no
       authby=rsasig
       leftsigkey=localhost.pub
       rightsigkey=ERRight.pub
       auto=route
       keyingtries=%forever
#conn peer-er-right.ubnt.com-tunnel-1
3. ER 외부 WAN 인터페이스를 통해서 수신하는 IKE 트래픽을 캡쳐합니다:
sudo tcpdump -i eth0 -n udp dst port 500
tcpdump: verbose output suppressed, use -v or -vv for full protocol decode
listening on eth0, link-type EN10MB (Ethernet), capture size 262144 bytes
IP 203.0.113.1.500 > 192.0.2.1.500: isakmp: phase 1 I ident
IP 192.0.2.1.500 > 203.0.113.1.500: isakmp: phase 1 R ident
IP 203.0.113.1.500 > 192.0.2.1.500: isakmp: phase 1 I ident[E]
IP 192.0.2.1.500 > 203.0.113.1.500: isakmp: phase 1 R ident[E]
IP 203.0.113.1.500 > 192.0.2.1.500: isakmp: phase 2/others I oakley-quick[E]
IP 192.0.2.1.500 > 203.0.113.1.500: isakmp: phase 2/others R oakley-quick[E]
Note
실시간 캡쳐의 결과이므로 아무런 결과가 발견되지 않는다면 클라이언트가 트래픽을 생성하지 않거나 트래픽 업스트림이 차단당한 것일수도 있습니다.
4. ER IPsec VPN 로그를 확인합니다:
sudo swanctl --log
[KNL] creating acquire job for policy 192.168.1.10/32[icmp/8] === 172.16.1.10/32[icmp/8] with reqid {1}
[IKE] initiating Main Mode IKE_SA peer-er-right.ubnt.com-tunnel-1[1] to 192.0.2.1
[ENC] generating ID_PROT request 0 [ SA V V V V ]
[NET] sending packet: from 203.0.113.1[500] to 192.0.2.1[500] (156 bytes)
[NET] received packet: from 192.0.2.1[500] to 203.0.113.1[500] (136 bytes)
[ENC] parsed ID_PROT response 0 [ SA V V V ]
[IKE] received XAuth vendor ID
[IKE] received DPD vendor ID
[IKE] received NAT-T (RFC 3947) vendor ID
[ENC] generating ID_PROT request 0 [ KE No NAT-D NAT-D ]
[NET] sending packet: from 203.0.113.1[500] to 192.0.2.1[500] (372 bytes)
[NET] received packet: from 192.0.2.1[500] to 203.0.113.1[500] (372 bytes)
[ENC] parsed ID_PROT response 0 [ KE No NAT-D NAT-D ]
[IKE] authentication of 'er-left.ubnt.com' (myself) successful
[ENC] generating ID_PROT request 0 [ ID SIG N(INITIAL_CONTACT) ]
[NET] sending packet: from 203.0.113.1[500] to 192.0.2.1[500] (348 bytes)
[NET] received packet: from 192.0.2.1[500] to 203.0.113.1[500] (316 bytes)
[ENC] parsed ID_PROT response 0 [ ID SIG ]
[CFG]   using trusted certificate "er-right.ubnt.com"
[IKE] authentication of 'er-right.ubnt.com' with RSA successful
[IKE] IKE_SA peer-er-right.ubnt.com-tunnel-1 established between 203.0.113.1[er-left.ubnt.com]..192.0.2.1[er-right.ubnt.com]
[IKE] scheduling reauthentication in 27804s
[IKE] maximum IKE_SA lifetime 28344s
[ENC] generating QUICK_MODE request 3062958650 [ HASH SA No KE ID ID ]
[NET] sending packet: from 203.0.113.1[500] to 192.0.2.1[500] (444 bytes)
[NET] received packet: from 192.0.2.1[500] to 203.0.113.1[500] (444 bytes)
[ENC] parsed QUICK_MODE response 3062958650 [ HASH SA No KE ID ID ]
[IKE] CHILD_SA peer-er-right.ubnt.com-tunnel-1{1} established with SPIs ca03_i cb9_o and TS 192.168.1.0/24 === 172.16.1.0/24
[ENC] generating QUICK_MODE request 3062958650 [ HASH ]
[NET] sending packet: from 203.0.113.1[500] to 192.0.2.1[500] (60 bytes)
Note
실시간 캡쳐 결과이므로 출력이 보이지 않는다면, 트래픽이 방화벽을 통해서 허용되었는지 확인하십시오. 다른 방법으로는 show vpn log | no-more명령어를 통해서 전체 IPsec 로그 히스토리를 확인할 수 있습니다.
5. Server1 과 Host1사이에 터널을 통해 트래픽을 전송해봅니다:
ping 192.168.1.10
PING 192.168.1.10 (192.168.1.10) 56(84) bytes of data.
64 bytes from 192.168.1.10: icmp_seq=1 ttl=63 time=45.9 ms
64 bytes from 192.168.1.10: icmp_seq=2 ttl=63 time=45.2 ms
64 bytes from 192.168.1.10: icmp_seq=3 ttl=63 time=45.5 ms

ping 172.16.1.10
PING 172.16.1.10 (172.16.1.10) 56(84) bytes of data.
64 bytes from 172.16.1.10: icmp_seq=1 ttl=63 time=43.9 ms
64 bytes from 172.16.1.10: icmp_seq=2 ttl=63 time=44.1 ms
64 bytes from 172.16.1.10: icmp_seq=3 ttl=63 time=44.4 ms
관련 문서